Persistent draughts from your doors and windows? Cold rooms? Then invest in insulation and draught-proofing to keep your home warm and reduce your heating bills.
Insulating your home needn’t be expensive and you’ll notice the difference immediately as your home will be comfortable and draught-free. It might be a small cost now but it will easily pay for itself after a few years, particularly if winters are as severe as in recent years.
Draught-proof windows and doors
Sealing draughts around doors, windows and skirting boards should be your first objective. Around 12% of heat is lost through draughts, but they can be reduced cheaply and easily.
Old windows and doors may need to be repaired and adjusted to fit their frames more closely. Loose glazing can be refitted and the putty and beading replaced. If the frames have a sufficiently deep rebate, it’s possible to fit very narrow double-glazed units in place of single glazing. Draught strips should be fitted around doors and windows to seal any remaining gaps.
Disused chimneys can be closed off, or a wood-burning stove fitted with a much smaller flue. Gaps in floorboards can be closed using fillets (wedges) of matching timber, sanded flush and finished to match your floorboards.
The loft should be draught-proofed, so any ducts or vents exiting through the loft should be sealed and the hatch insulated and fitted with draught strip. Although preventing draughts is important, it is essential to leave ventilation ducts and airbricks clear – closing off all ventilation leads to condensation and damp problems.
Insulate loft space
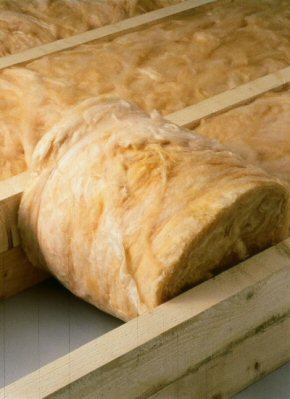
Around 26% of the heat loss in the average house is through the roof. If the loft space is not used then insulation can be added to the ceiling between the attic joists.
To meet the current Building Regulations you’d need to fit 270mm of mineral wool insulation. Typically this would mean 100mm between the ceiling joists and 170mm laid over the joists at 90 degrees to the bottom layer. Fitted on a DIY basis, the cost for an average three-bedroom house would be between €200 and €400. The annual saving on fuel bills would be around €175.
If you want to use the loft for storage, rigid insulation boards are more suitable. Two layers of 50mm extruded polystyrene boards laid between the floor joists, plus 18mm flooring grade tongue-and-groove chipboard is equivalent to 270mm of mineral wool and would cost around €500.
If the loft space is converted as living space, the insulation will need to be fitted in the slope of the roof. As the depth between the rafters is not usually sufficient to take 270mm of mineral wool, a more thermally efficient form of insulation is usually used. A typical solution would be foil faced, rigid urethane insulation boards, fitted both between and over the rafters.
Another option is to incorporate multilayer foil and bubble wrap insulation, which is more space-efficient, but not accepted by every local authority – call your local authority to check. Whichever material is used it should be carefully taped together to make it as airtight as possible.
If the roof is being stripped, there is the option to add roof insulation between and over the rafters, which leaves more useable space within the loft. An alternative for where there is no roofing felt is to spray urethane foam insulation on the underside of the roof tiles, which can seal the roof, fix loose tiles and insulate the space all in one application.
How to insulate your walls
Around 33% of heat is lost through walls, but how insulation is added to prevent this will depend on whether the walls are solid, or of cavity construction, and the house’s location.
Solid walls: Most houses built before 1918 have solid walls – insulation can only be added either to the inside or the outside. Internal insulation involves removing all architectural details from the inside face of the external walls (the skirt, architrave, etc) and possibly the plaster and mechanically fixed metal or timber studwork. The space between the studs can then be filled with insulation – breathable materials like mineral wool or cellulose are best.
The studs are covered in plasterboard and taped and jointed, or skim coated, the architectural details replaced and the walls redecorated. The void behind the wall must be ventilated to prevent damp problems – usually via vents in the skirting boards. The overall thickness is typically 75-115mm, so some space is lost within the house.
External insulation: Where the external walls are not an important part of the character of the building, insulation can be applied to the outside face of the walls and covered in render or other cladding such as timber boarding, hung tiles or brick tiles. Insulation boards may be mechanically fixed directly to the external walls and then covered in a reinforcement mesh and breathable render. Alternatively, a system of timber or metal studding with insulation in between the studs can be used. Contact insulation suppliers to find the suitable specification for your property.
External insulation is unlikely to be acceptable on a listed building and will require planning permission in a designated area such as a conservation area and on other properties where permitted development rights are restricted or removed, such as flats.
Cavity walls: Most homes built from around 1918 onwards had the walls constructed from two leaves of masonry with a clear cavity in between, designed as a barrier to penetrating damp. Cavity walls can be insulated by drilling holes from the outside and injecting the insulation such as urethane, cellulose, mineral wool fibres, or expanded polystyrene beads, into the void.
Insulating between floorboards
If the floorboards are being lifted there is the option to fit insulation between the joists at ground floor level. Space is unlikely to be a problem, so mineral wool is usually used, suspended on wire netting.


