Installing Roof Structural Timbers
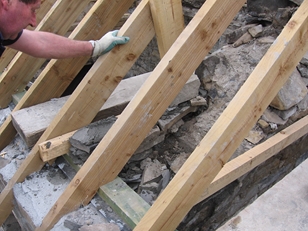
Building a timber roof may not be as hard as you think! Wood is a very forgiving material and if you take the time to set the project out it can be very enjoyable process. Follow the sequence of this process and the challenges I faced, Securing the Wall Plate, Re-building the stone gables, Installing the roof timbers, Placing Roof Insulation, Choosing slates edgings and gutters.
The Existing Roofs
After removing the existing asbestos roof and straw roof underneath we discovered three roofs each added to each other over time. All had extensive wet rot (rot dew to exposure to water) and wood worm. While they had beautiful dove tail joints they had to go as they were designed to support straw and would not support a natural slate roof.
Choosing Timber
Always use certified sustainably sourced timbers, suppliers will happy to tell you the source of there timber and issue certificates if you ask. For most roof applications where the timber is not exposed you will used rough deal pine timber. For areas where you are exposing timbers to the inside you can use red deal (heat treated to reduce moisture content) or white deal pine or Douglas Fir. I prefer the colours of Douglas Fir and tend to use it where I can.
Storing Wood
Wood deforms very easily make sure to stack it with ventilation gaps every layer to keep it dry. It is best to store it indoors but if stored outside make sure to put a tarp over it. Try to store the wood near where you will work with it so you can avoid double movements on site.
A good wall Plate
A wall plate is where the base of the roof meets the wall of the building. It ties the building together and prevent the roof sailing off with the wind by strapping it down to the walls. In historic stone buildings the wall plate can be tied into or built into the wall with vertical timbers literally stitching the roof to the walls of the building.
In most cases of derelict buildings the wall plate would be two damaged to repair and you would place a ring beam across the top of the wall. In my case the existing wall plate was in good connection and stable. There were two locations where we notched out a half meter strip and replaced it.
The existing wall plate was all over the place up to 50-100mm variation in width. Having parallel wall plates is paramount to a good roof and to solve this we installed a new wall plate above the old one to iron out the differences.
A two man Job
This is a two man job and anyone will tell you if you do it alone you will spend your day cursing your self after having climbed the scaffold having forgot your hammer!. The weather is also a major factor; wet wood is difficult to cut and shrinks after installed. With this in mind and recognising my geographical limitations I enlisted the help of a local roofer.
Pre or Post Treating Timber
When purchasing the timber I chose to have the timber pressure treated in a factory. Pressure treatment pushes the chemicals deeper into the wood and makes for a more durable roof. You can also treat the timber in place or on the ground with creosote; this is a long process and weather dependant. The result is good but only on the surface of the wood and is less durable. You can use different treatments but generally they treat for wood worm, wet rot and dry rot.
Grade of Timber
Timber comes in varying grades C14, C16, C24. Generally the higher the number the stronger and straighter the wood is. Your engineer may specify higher grade depending on the structural issues you face, but generally C16 timbers are used. If insulating between joists with rigid insulation C24 is straighter and easier to insulate as there are less twists in the wood.
Timber Centres
Roof Joints are located on centres of generally 400/450mm. Again this is dependant on your engineer’s advice. If you are lining the interior with plasterboard or plywood you need to make sure your centres works for the dimension of your interior boards so you can avoid the waste of your time, materials and disposal costs.
Nail Guns
In short save your self bruised fingers and invest in a first fix nail gun. It pays for its self in the time it will save you. Take care though while they all have good safety features they are dangerous.
Stay tuned to my next blog in this sequence "Placing Roof Insulation".
Useful Links
http://www.irishhardwoods.com/


