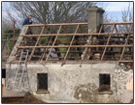

With good spring weather in hand; the next job in my building plan was to replace the roof and seal the building before the winter. This next blog will bring you through the sequence of this process and the challenges I faced, Securing the Wall Plate, Re-building the stone gables, Installing the roof timbers, Placing Roof Insulation, Choosing slates edgings and gutters.
History of the roof : This cottage was built sometime in 1820’s as a herdsman lodge. Just as the stone that was excavated from the site to build the walls, the original roof was made of straw probably sourced from the field behind.
Modernisation through the ages saw the installation of three roofs all contained inside the existing roof. The first roof was used to support the original straw roof, which as I expect over time naturally started to weaken. The second roof was added at a higher level and re thatched. This roof was later added to and strengthened after a fire in the centre of the building. In the 50’s the third roof made of asbestos sheeting was added over the thatch.

It was a surprise to me to reveal all this history and unique carpentry jointing. Unfortunately it wall all designed to support a light load of straw and my conditional permission was granted for a heaver natural slate roof. In addition the existing roof was uneven and was beyond repair. I would not take any chance and decided to replace it fully.
Wall Plate: When the roof had been stripped down the existing wall plate seemed to be in reasonably good condition considering the condition of the existing roof. As there were no screws in the old days the wall plate was fixed to the wall by vertical timbers nailed to the wall plate and imbedded into the wall.
I had two options to create a good solid connection to the wall. I could remove the wall plate, undertaking some demolition and installing a concrete ring beam in a U shaped Block as a base for a new wall plate or I could work with the existing wall plate.
I decided to work with the existing wall plate as it was very secure. I removed and replaced the damaged wet rot timbers and treated the entire wall plate with a preservative to guard against wet rot, dry rot and wood worm. You can generally know the difference by the two as a timber exposed to moisture contains we rot and timbers that are not adequately ventilated contain wet rot, wood worm.
I also installed additional fixings into the stone bed below the wall plate. I discovered that the existing wall plate was not parallel with each wall. Building from that platform would produce an uneven roof with uneven roof slates. To avoid this I installed a new wall plate fixed to the existing wall plate with ironed out any unevenness.
With the wall plate secured we could start to set out the roof which would reveal more unknown issues to resolve.
Stay tuned to my next blog in this sequence “Re-building the stone gables” where I throw my hand at building cut stone walling under the guidance of a professional.
Useful Links

Advertisement